How does Sortable lists plugin work?
$('.sortableLists').sortableLists( options );
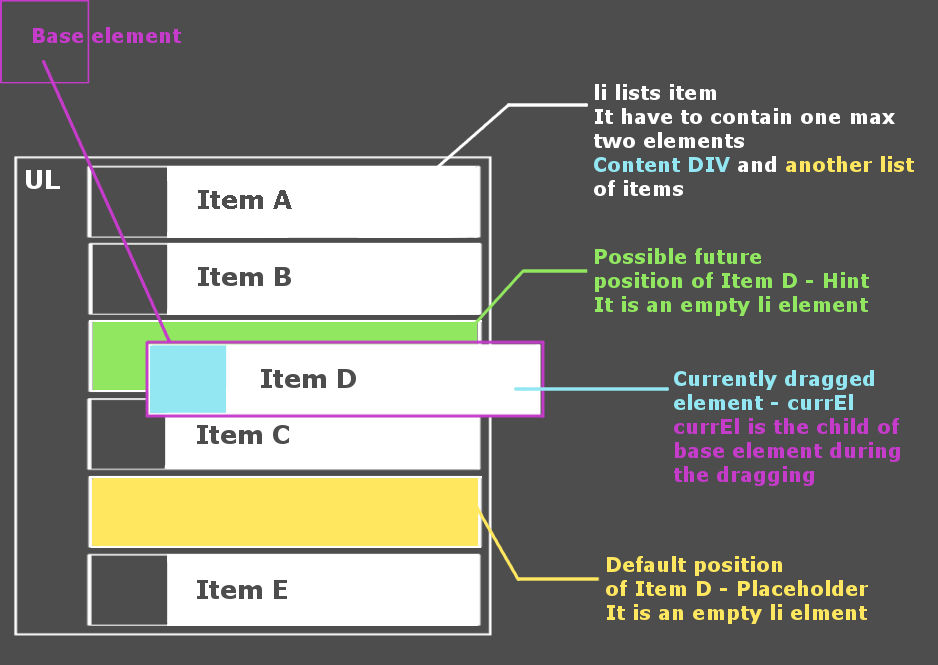
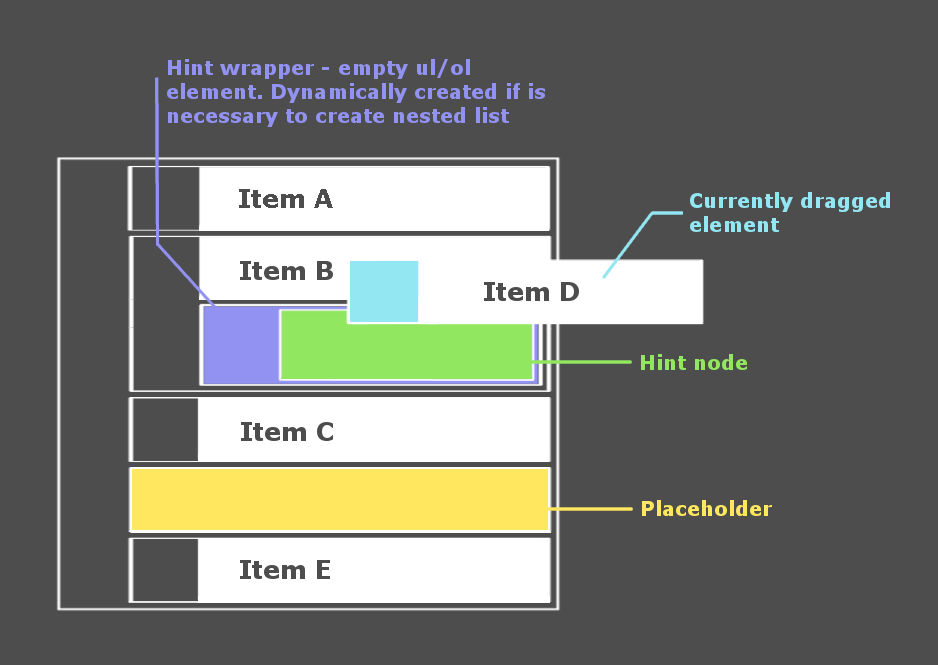
You can sort an items of html lists by mouse. Create tree structures. Format all active items CSS. Set insertZone, insertZonePlus, scroll, maxLevels .... Available callbacks are onDragStart, isAllowed, onChange, complete. Plugin offers three export functions toArray, toString and toHierarchy. For better understanding look at the picture which describes all active elements in sortable lists plugin.
Plugin supports also mobile devices. Link jquery-sortable-lists-mobile.js instead of jquery-sortable-lists.js.
Look at the example and try it yourself.
-
Item a
-
Item b
-
Item b1
-
Item b2 - clickable text
-
Item b3
-
Item b4
-
Item b5
-
-
Item c - c block disallows inserting items from other blocks
-
Item c1
-
Item c2
-
Item c3
-
Item c4
-
Item c5
-
-
Item d
-
Item d1
-
Item d2
-
Item d3
-
Item d4
-
Item d5
-
-
Item e
-
Item f
JQuery sortable lists also supports export methods. Look at the console log to see the result of buttons below.
To array To hierarchy To stringhtml pattern
Note that li items can contains only one or max two direct children. Content div as a wrapper of li content and another list if item contains nested list. Like this:
<ul>
   <li>
      <div>Whatever you want here</div>
      <ul>
         <li><div>Nested list item</div></li>
         <li><div>Another item</div></li>
      </ul>
   </li>
</ul>
css pattern
If you format li elements this way
#myList li { background-color:#ddf, padding-left:50px }
you have to add this selector to css file.
#myList li, #s-l-base li { background-color:#ddf, padding-left:50px }
Every dragged item is appended to the base element. It ensures smooth dragging and scrolling. For more information about base element look at the picture below and at the Base element description.
All settings are placed in object which is the only parameter of .sortableLists() function.
$('.sortableLists').sortableLists( options );
That's all. Everything else is optional.
This pictures shows you how it works inside. Click to show.


Active elements
base element
Most important element. Every dragged element is appended to the base element while dragging. Sortable lists plugin adds this element in to the body at the background. It is the ul/ol element with css properties: position:absolute; top:0; left:0. This element is the base for calculation the position of dragged element. This ensures smooth movement while dragging and scrolling. Another plugins have big problems with it.
Be careful how you format nested items. Base element makes only one level ul li relationship. So do not use more levels to format your lists like ul li ul li in your css file.
// Do not use this to format lists
#myList li ul li { ... }
// cause baseElement makes only one level relation
#s-l-base li { ... }
currently dragged element
Is dragged element of course. You can have a little problem with the formatting this element. It caused the fact that dragged element is the child of the base element during the dragging. Look at the Css pattern how to solve it. Current element has class - s-l-current which helps you to format the item. You can do it also through the options object by currElClass or currElCss properties. Note that classes s-l-current and currElClass will be removed after the dragging but currElCss not.
var options = {
	// Like a css class name. Class will be removed after drop.
	currElClass: 'currElemClass',
	// or like a jQuery css object. Note that css object settings can't be removed
	currElCss: {'background-color':'green', 'color':'#fff'}
}
placeholder
Sortable lists plugin generates this li element at the background. Element holds the default position of dragged item while dragging. Element has id - s-l-placeholder. You can also set the css via placeholderClass or placeholderCss in options object.
var options = {
	placeholderClass: 'placeholderClass',
	// or like a jQuery css object
	placeholderCss: {'background-color':'yellow'}
}
hint
This element generates the plugin at the background. Element shows the possible future position of dragged item. You can set the css via hintClass or hintCss in options object.
var options = {
	hintClass: 'hintClass',
	// or like a jQuery css object
	hintCss: {'background-color':'green', 'border':'1px dashed white'}
}
hint wrapper
Plugin generates this element if is necessary to wrap the future position by ul/ol. Default type of wrapper is UL. You can change it in settings object by listSelector property. The hintWrapperClass is removed after the item is inserted inside the list. So the final css of the wrapper is determined by listsClass property of options object or by default. Look at the next paragraph.
var options = {
	listSelector: 'ol',
	hintWrapperClass: 'hintClass',
	// or like a jQuery css object
	hintWrapperCss: {'background-color':'green', 'border':'1px dashed white'}
}
another settings
list selector, list class
Sortable lists plugin needs to know which type of lists(ul/ol) you want to use if is necessary to wrap item by ul/ol. Plugin also does not know which classes do you use to format your lists so you have to set listsClass or listsCss property of settings object. You can do it also by baseElementClass.
var options = {
	listSelector: 'ol',
	listsClass: 'listsClass',
	// or like a jQuery css object
	listsCss: {'background-color':'silver', 'border':'1px solid white'}
}
ignoreClass
Usually sorting lists is not the only functionality which your lists should provide. Cause jquery sortable lists works with dragging which fires onmousedown event with preventDefault, you can have a problem with onclick events. This solves the ignoreClass which ensures that onmousedown wont trigger dragging.
var options = {
	// All elements with class clickable will be clickable
	ignoreClass: 'clickable'
}
insertZone
This property defines the distance from the left, which determines if item will be inserted outside(before/after) or inside of another item.
var options = {
	insertZone: 50
}
insertZonePlus
This property extends insert zone functionality. Ensures displaying hint node outside(before/after) every time even if cursor is in inside inserting zone. This option is little expensive so check it carefully.
var options = {
    insertZonePlus: true
}
example
- Item 1
- Item 2
- Item 3
- Item 4
scroll
This property defines the speed of auto scrolling.
var options = {
	scroll: 20
}
opener open/close function
This option enables you to hide/show nested lists. Plugin prepends span element to the content div of items with nested lists. You can set this element through the opener object of options. At first you have to activate the open/close function. Next step is setting of open and close property as html or css class of the span. If you are using html or css class you have to set as property to "html" or "class". You can style opener vie jq. css object or css class. Look at the example code below.
var options = {
	opener: {
		active: true,
		as: 'html',  // or "class"
		close: '<i class="fa fa-minus red"></i>', // or 'fa fa-minus'
		open: '<i class="fa fa-plus"></i>', // or 'fa fa-plus'
		openerCss: {
			'display': 'inline-block', // Default value
			'float': 'left', // Default value
			'width': '18px',
			'height': '18px',
			'margin-left': '-35px',
			'margin-right': '5px',
			'background-position': 'center center', // Default value
			'background-repeat': 'no-repeat' // Default value
		},
		// or like a class. Note that class can not rewrite default values.
		// To rewrite defaults you have to do it through css object.
		openerClass: 'your-class-name'
	}
}
Default behaviour(if opener is active) is to close all nested lists on page load. If you want to show some nested lists you have to add "s-l-open" class to the parent li element of nested list.
<ul>
   <li class="s-l-open">
      <div>Content div</div>
      <ul>
         <li><div>This nested list</div></li>
         <li><div>will be visible on page load</div></li>
      </ul>
   </li>
</ul>
maxLevels
MaxLevels is a feature which does not allow to create more levels of nested lists than the value of maxLevels option. Default is false so you have to activate the feature by numeric value.
var options = {
	maxLevels: 2
}
callback isAllowed
isAllowed is anonymous function which determines if item can be inserted to the active area. It takes three arguments: currEl == currently dragged el., hint == hint, target == li wrapper of hint element. Look at the code of isAllowed from first example of the page. It disallows you to insert item to the "c" module if it is not from "c" module by default.
var options = {
    isAllowed: function(currEl, hint, target)
    {
        if(hint.parents('li').first().data('module') === 'c' && currEl.data('module') !== 'c')
        {
            hint.css('background-color', '#ff9999');
            return false;
        }
        else
        {
            hint.css('background-color', '#99ff99');
            return true;
        }
    }
}
callback onDragStart
Is called before dragging. Takes two arguments: e - jQ event object and el - dragged li element.
var options = {
	onDragStart: function(e, el)
	{
		// Whatever you need to do before dragging
	}
}
callback onChange
Is called after the drop but only if the position of dragged element was changed. Takes one argument: cEl - currently dragged element.
var options = {
	onChange: function(cEl)
	{
		// Whatever you need to do if position was changed
	}
}
callback complete
Is called every time after the drop. Takes one argument: cEl - currently dragged element.
var options = {
	complete: function(currEl)
	{
		// Whatever you need to do after the drop
	}
}
To array, to hierarchy, to string
JQuery sortable lists also support this three function. They do what they say - return representation of the list as array, tree or string. Look at the first example on the page. They are implemented as plugins so you can call it this way:
$('#toArrBtn').on('click', function(){ console.log($('#sTree2').sortableListsToArray()); });
$('#toHierBtn').on('click', function() { console.log($('#sTree2').sortableListsToHierarchy()); });
$('#toStrBtn').on('click', function() { console.log($('#sTree2').sortableListsToString()); });
Do not do this:
Do not use construction where ul with margin top is direct child of body
<body><ul style="margin-top:XYpx">.
Margin-top breaks the position of dragged element.
Do not use more than one level css pattern to format li. Look at the base element description.